The correct neck alignment on any guitar is extremely important: the outer strings have to run parallel to the fingerboard edges from the nut to the bridge and the neck center line should line up correctly with the body center line. If the neck is not mounted dead straight, parts of an outer string might end up off the fingerboard. The pocket that will accept the neck is best cut with a flush-trimming cutter bit with shank-mounted ball bearing. For this purpose you need an accurate 1:1 template of the neck shape. Such templates are commercially available for standard Fender-style necks but I find it difficult to fasten them correctly aligned.
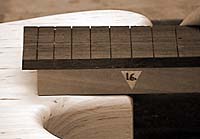
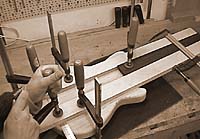
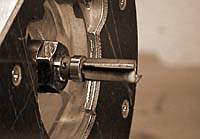
Personally I prefer using a jig made up of two long, 19mm (3/4")-thick and about 50mm (2")-wide boards plus another short piece of wood to using just one template for defining the shape of the neck pocket. The straight edges required on the boards are easy to plane. As you will see in picture 1 the neck profile hasn't been shaped but the fingerboard is glued on and the neck blank is already trimmed flush to the fingerboard on the table router using a flush-trimming bit with shank-mounted ball bearing.
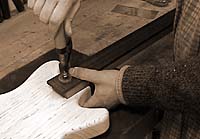
Place the neck in exactly the position it will eventually be in and
fasten it on the body provisionally using a clamp and a clamping
caul.
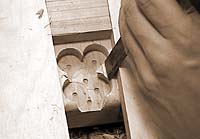
Then put the two straight, narrow boards to the left and right of
the neck and clamp them to the neck at the 1st and 14th fret (the
second clamp is missing in the picture above).
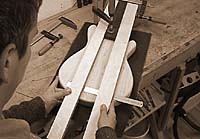
A rule taped down across the body in the bridge area - a zero-mark
in the middle of the rule would come in very handy - helps to
center the neck. If the guitar is to have a pickguard, fasten it
temporarily for aligning the neck. The neck can now be aligned very
accurately by lining it up on center with the body.
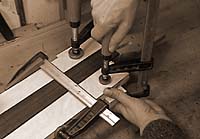
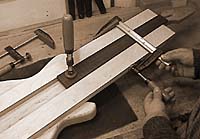
When the correct neck alignment has been found fix the position of
the two boards by fastening each of them with two clamps at the
lower body end. It is important that the four clamps are placed out
of the way of the router. At the upper end of the neck the distance
between the two boards is fixed by placing a short scrap board
under the neck and across it. Fasten the board with two clamps.
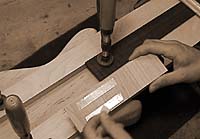
Now insert a third piece of wood at the lower end of the neck. It
doesn't matter if this piece doesn't fit in tight because
the ball bearing of the cutter bit is large enough to not follow
into any gaps in the corners. If the end of the neck is rounded
off, the front end of the piece of wood has to be cut and filed
accordingly to ensure it fits in. Since the piece of wood and the
two boards are all 19mm (3/4") thick, it would also fit under
a fingerboard that is longer than the neck. Fix the piece of wood
with thin double-stick tape. Thick tape such as that used for
fastening mirrors would be far too strong for this purpose and
would make it very difficult to remove the piece of wood
afterwards. Apart from that the marks left by such tape would also
be very difficult to get rid of.

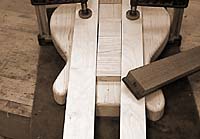
The two clamps placed on the boards right at the beginning can now
be removed in order to allow removing the neck. And here it is an
exact aligned 1:1 template for your ball-bearing cutter bit.
How thick the template has to be made depends on the length of your
cutter bit - the ball bearing must obviously touch the edge of the
template. Flush-trimming cutter bits with shank-mounted ball
bearing are commonly 1" long. There are also 3/4"- and
1/2"-long bits, but these are less common and more difficult
to get hold of. I use a 1"-long cutter bit, which is why the
template has to be quite thick.
The depth of the neck pocket depends on the bridge used: when the
saddles on the bridge are set to their lowest position the strings
should touch the fingerboard. The pocket depth is therefore
"thickness of neck plus fingerboard (25mm or 1") minus
lowest possible saddle height".

Pre-drill the pocket to keep stress on the router bit to a minimum
and clean it up with a chisel. If you use a brad point bit or a
Forstner bit, always take its point into account. Lower the drill
bit onto the wood until its point almost touches the surface. Now
set the drilling depth just a little shallower, to be on the safe
side. The depressions left by the point of the bit are finally
routed off when you cut the pocket out in several passes.
A mistake commonly made when adjusting the router is to not take
the thickness of the template into account. Put the the router on
the template and lower the bit until it touches the body surface
and then lock it. The cutting depth can now be set by putting a
shim of appropriate thickness under the depth stop.
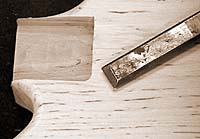
You can round off the neck end according to the radius of the
router bit or you square up the corners of the neck pocket with a
chisel. The tighter the neck fits into the body and the flatter the
contact surfaces are, the better the sound transmission will be.
But don't overdo it - if the neck fits in too tight it
won't go in after finishing the neck.
--
This way of making neck pockets (and much more) can be found in my books "Building Electric Guitars" and "E-Gitarrenbau"